If we were to compare the Workforce Manager Diary to a filing cabinet, the Workforce Manager database is the filing cabinet.
Within a filing cabinet, you would usually store folders sorted alphabetically for each customer. Within workforce Manager, we call these Sites.
Each folder within the filing cabinet (the customer folder) would then contain the Rep (engineer) reports that were completed at the time someone visited the customers location. I.E. to make a delivery, attend a sales visit, repair a product, install something. Within Workforce Manager, we call these 'Job Tickets'.
Each Job Ticket has one or more bookings attached to it that represent each visit that is made to the site in order to complete the instruction on the Job Ticket.
E.G. Most jobs are done within one day or just a few hours which would mean the Job Ticket would only require one booked day. However, if we were attending a job such as an 'Installation' that took several days to complete, there may be several bookings (one for each day) attached to the same Job Ticket.
Booking Site Visits
Initially, the diary will be empty. You will be presented with a screen as shown in the image below.
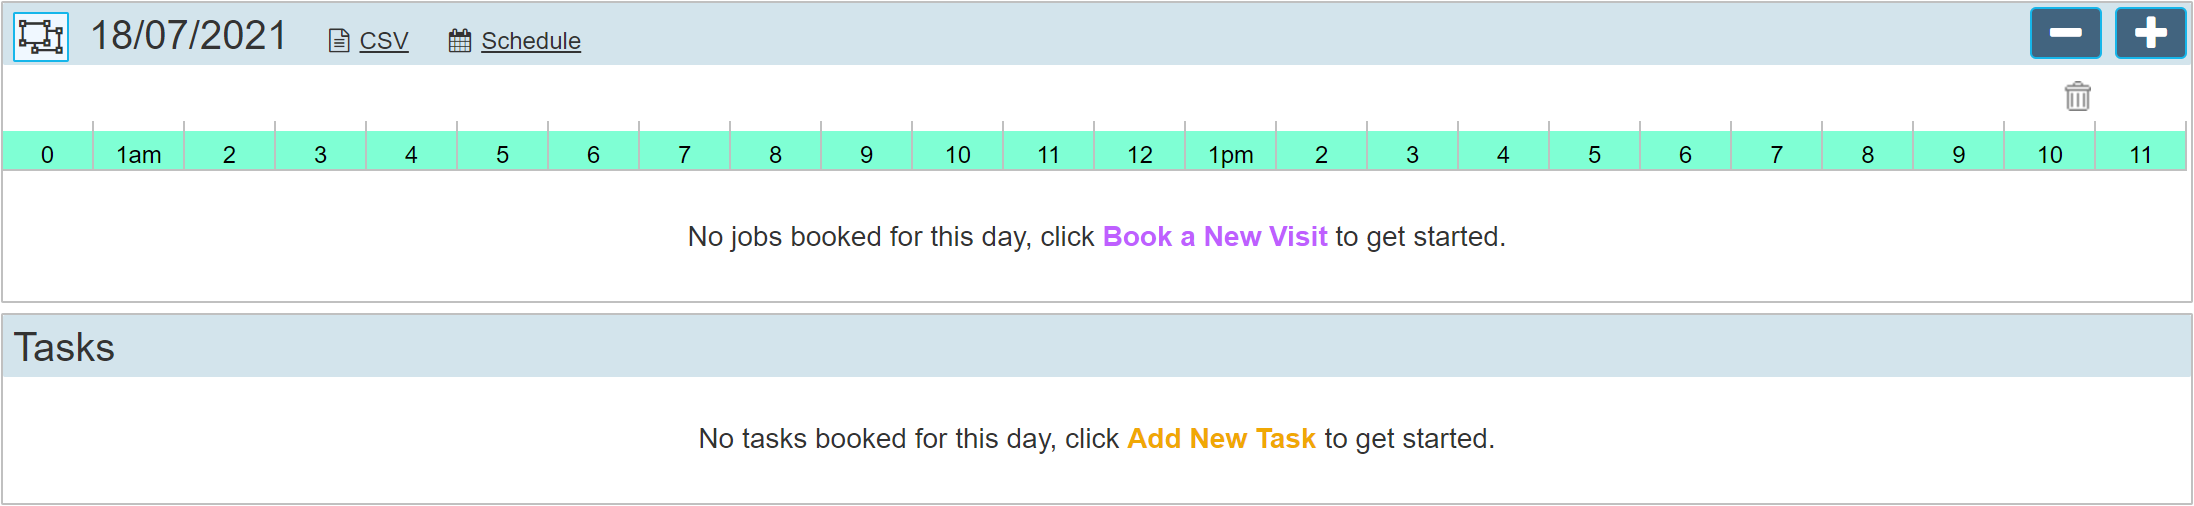
There are several ways to book jobs onto the system, in this 'Getting Started' guide, we will concentrate on just one of these, this method will enable jobs to be booked within the minimum of time.
In the image above we can see 'Book a New Visit' and 'Add New Task'. We are going to click 'Book a New Visit'
We can equally click the 'Book a New Visit' button shown within the LH menu, after which the following dialogue will open.
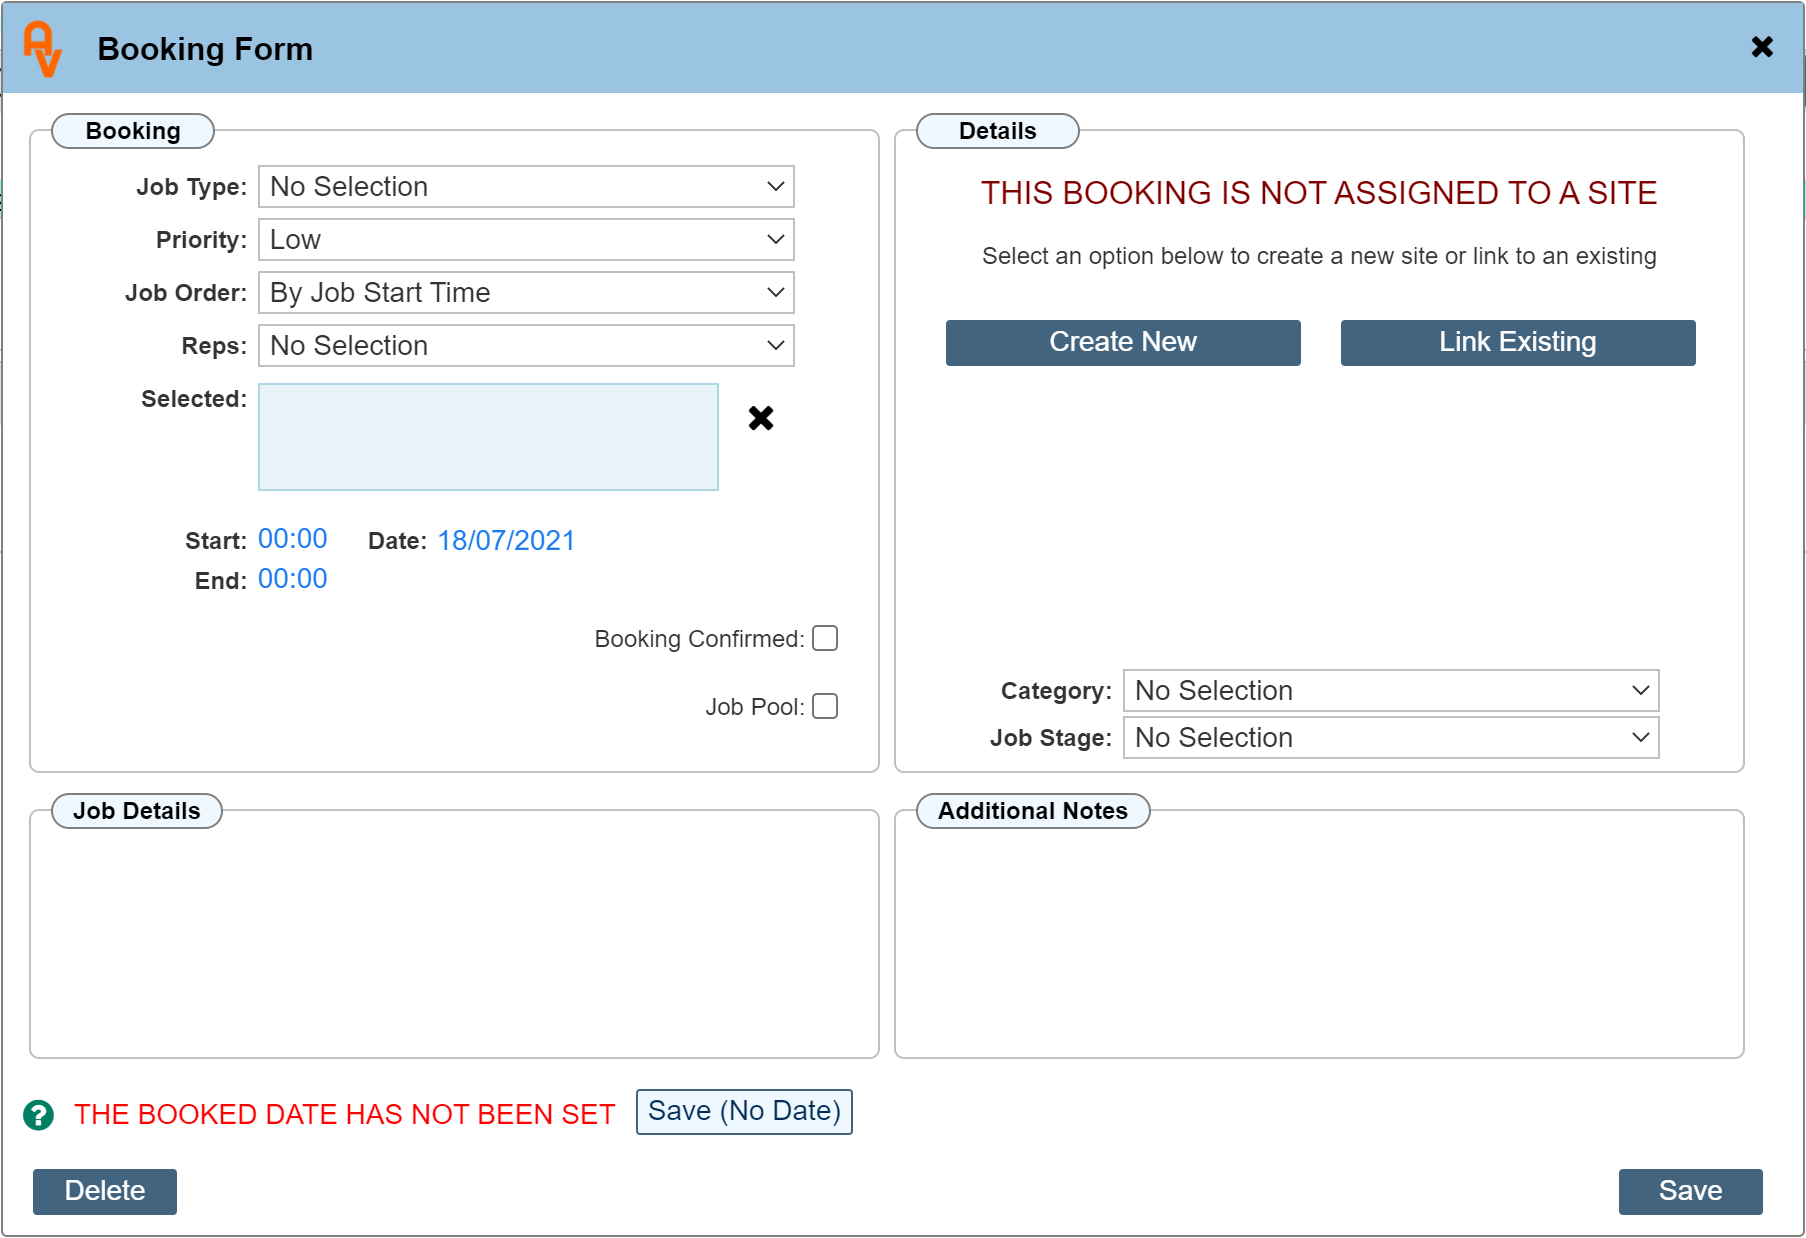
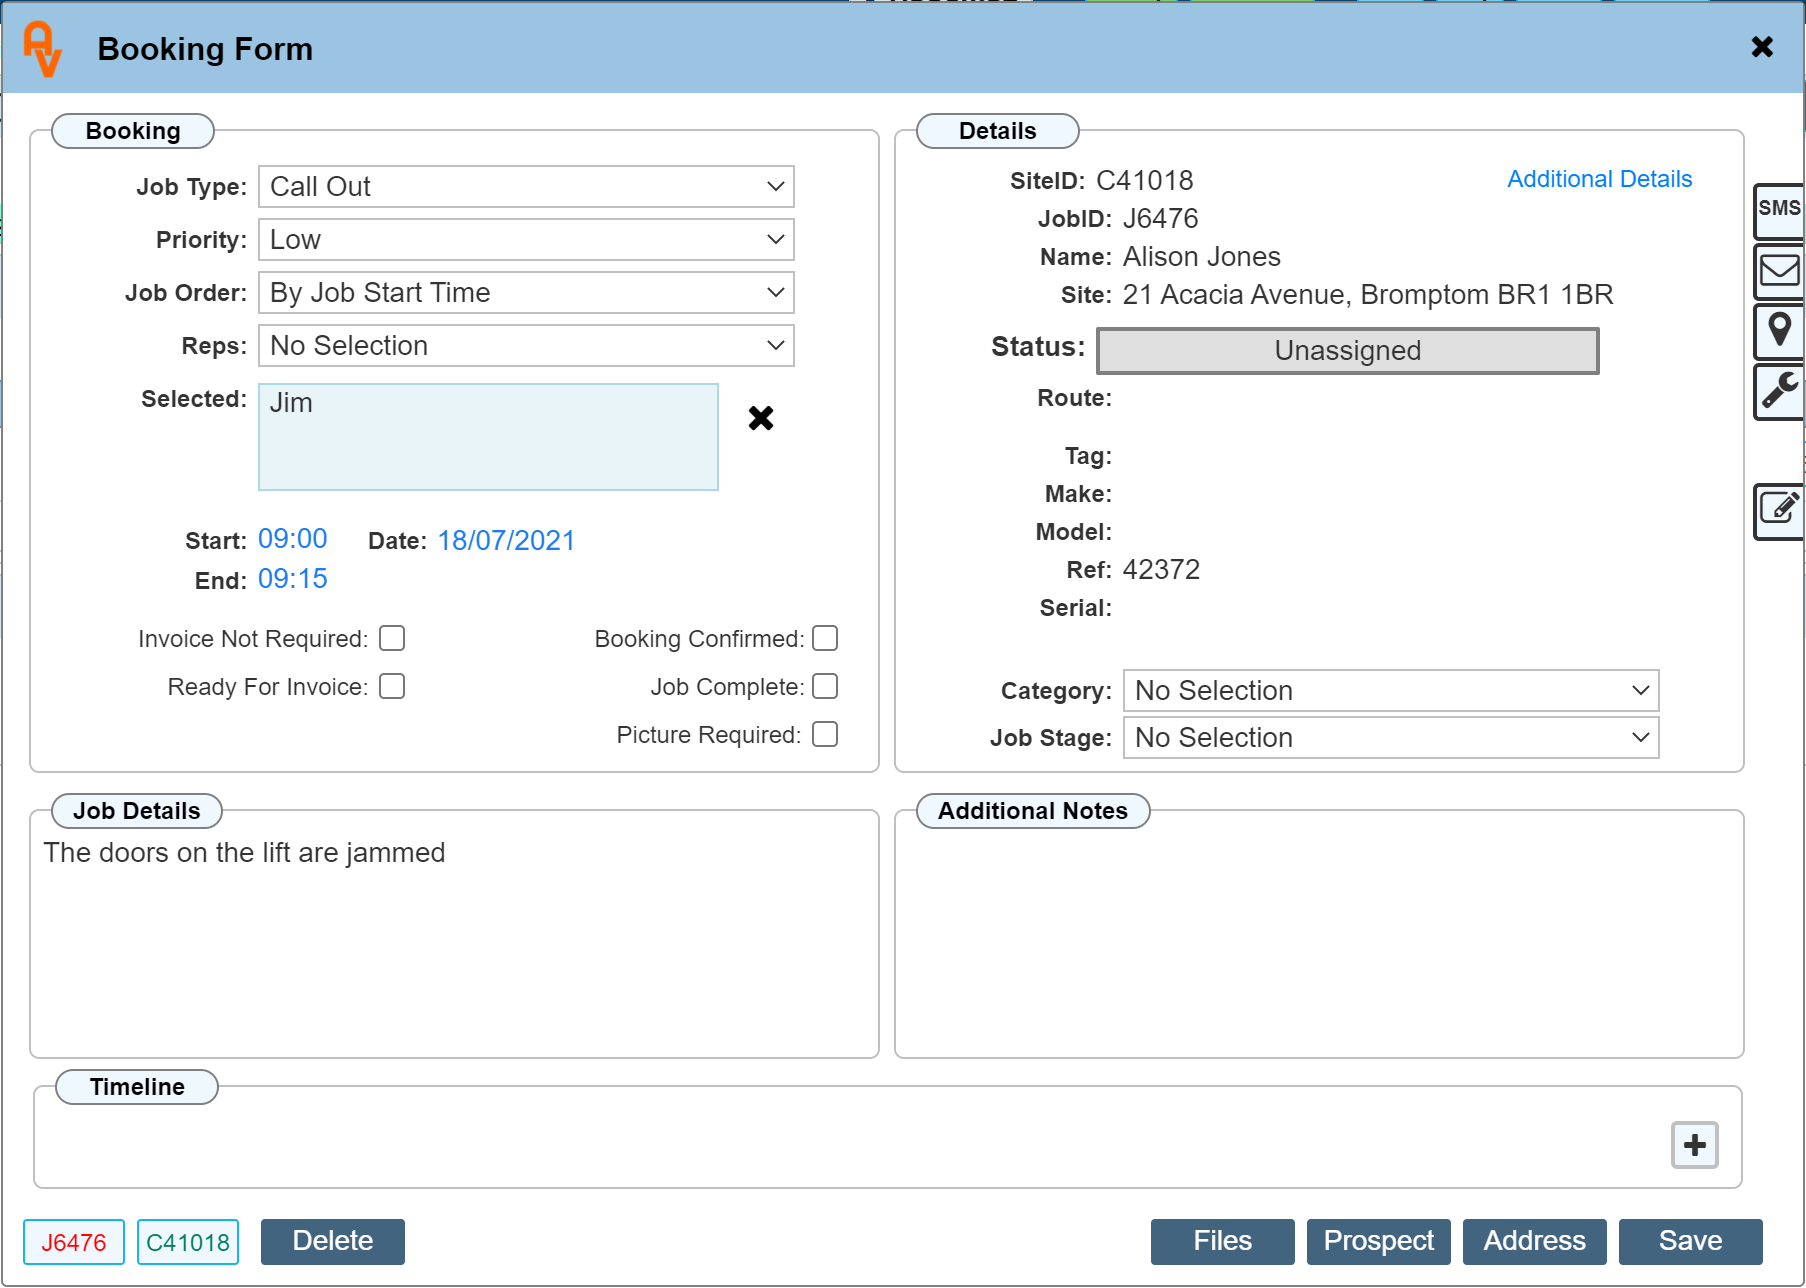
Set the Job Type
The Job Type drop down will be populated with some default job types. These may be changed, or new ones added within the system settings. For this exercise, we will select 'Call Out'.
Allocate an attending Rep
Within the 'Rep' drop down list, select who will be attending the visit. You may at this stage be testing the system, we would recommend you select any other rep than yourself (add a new one if none exist) to prevent being logged out of the system where trying to use two devices at the same time with the same login credentials is prohibited.
Enter the Visit Date and Time
The dialogue will always open with the current selected date show as the booking date. I.E. The date highlighted in the calendar shown within the RH menu. Click the date to change the date if required. Click the time to edit the time that the visit will be made.
Enter the Job Details
The Job Details section allows you to enter the job specific details. I.E. What is it you want your engineer to do.
Now that the basic job details have been entered, we could in fact save the booking on the diary as it is, however without an address location it would not be of much use if a rep had to attend a customer site location to complete the work.
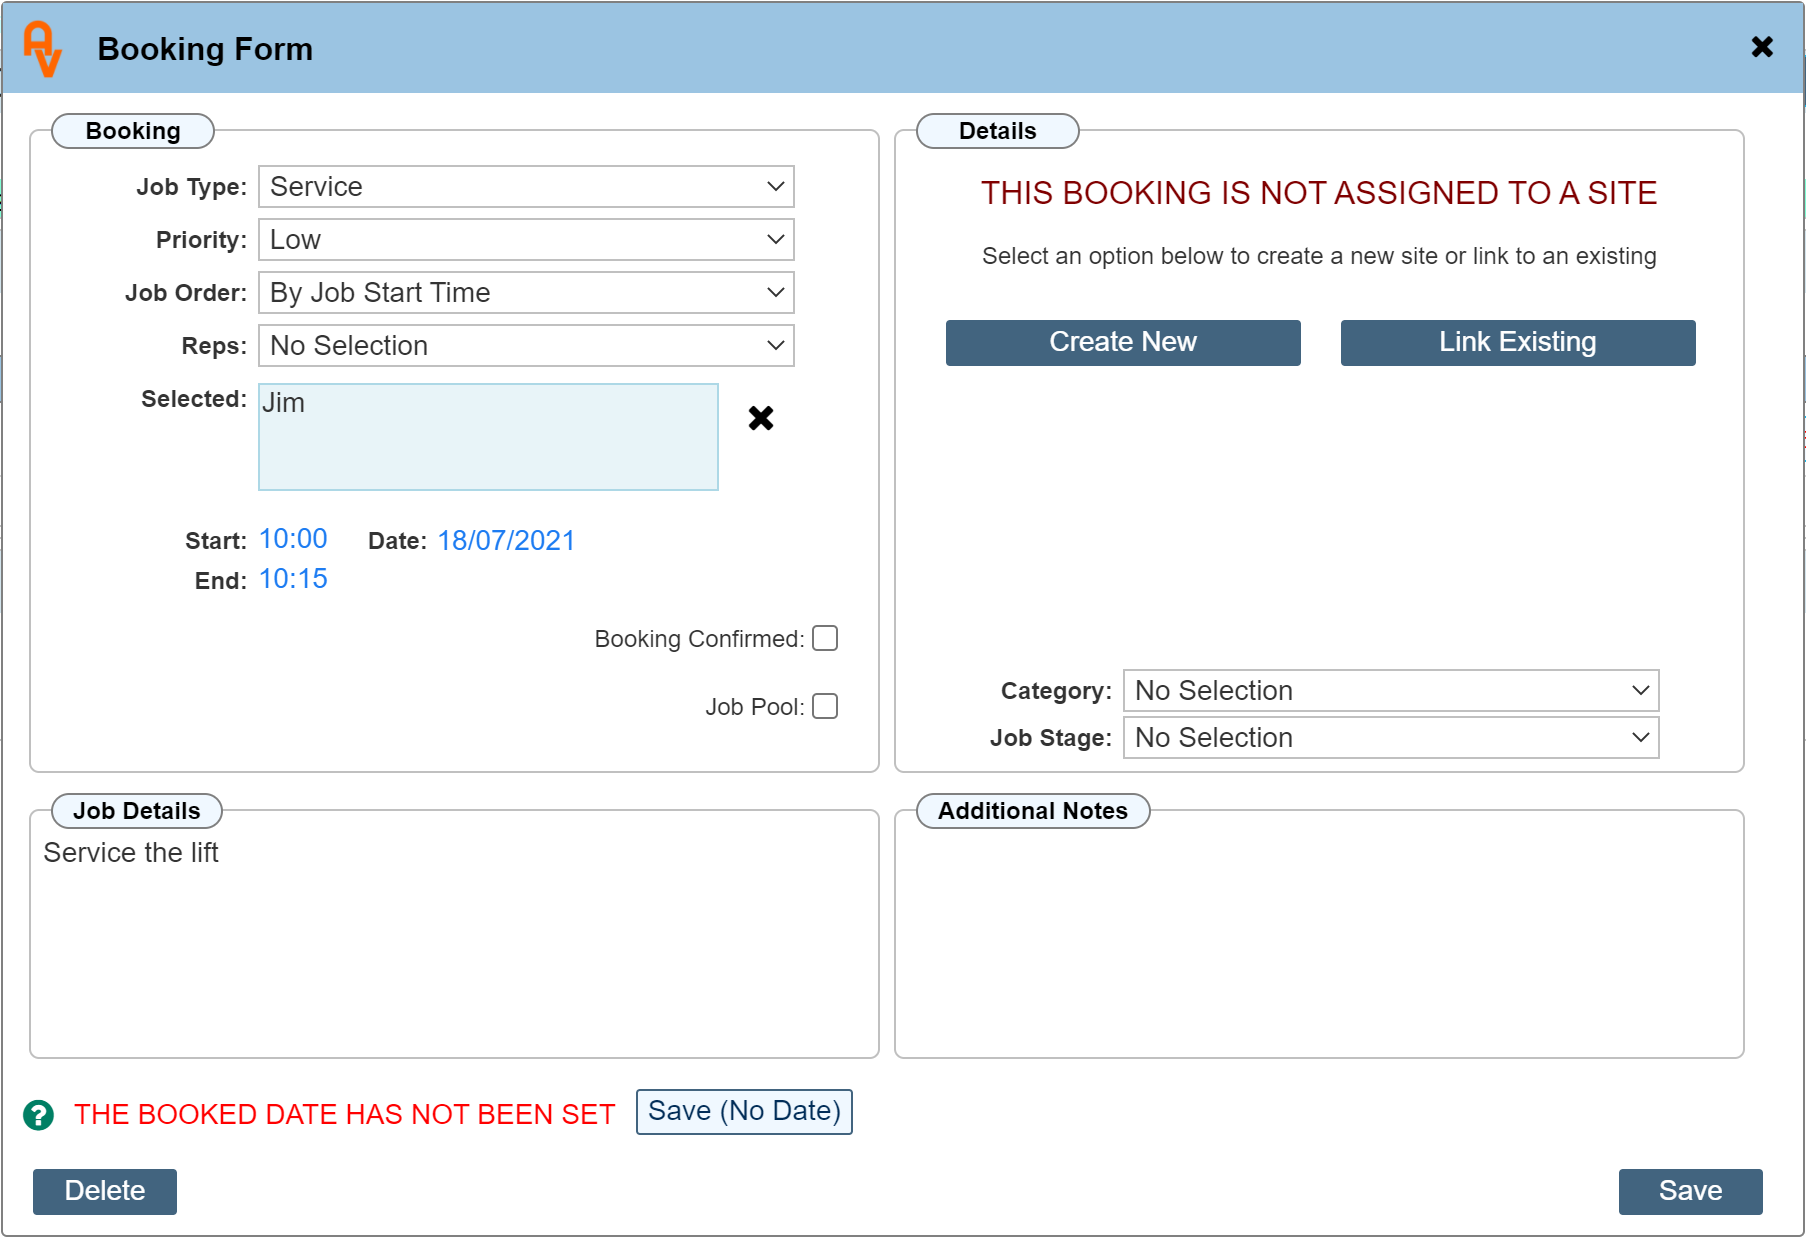
We now have to decide if the booking is for an existing customer, or is it a completely new job booked for a new customer. We will cover both scenarios.
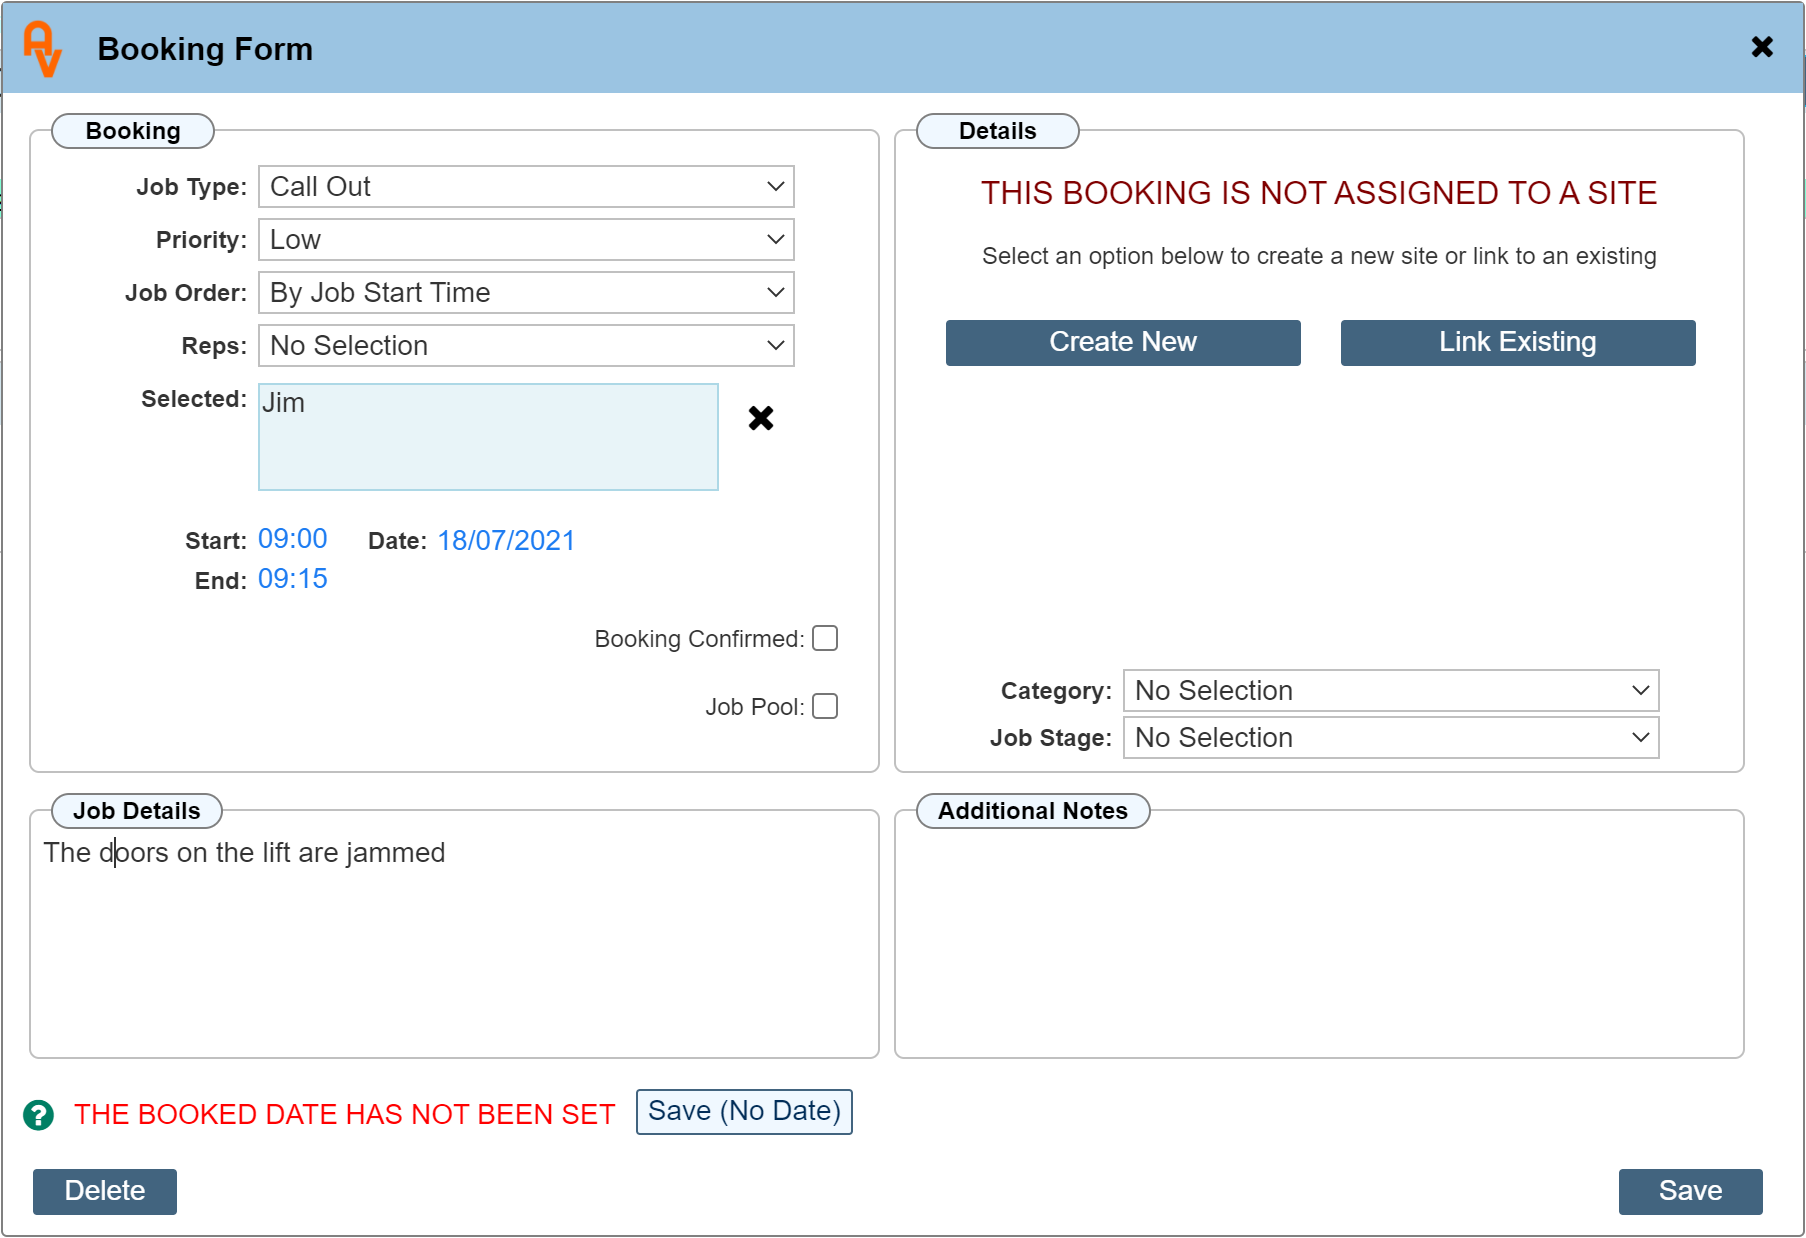
Create New
This option is used when the booking is for a completely new customer. Clicking 'Create New' opens the address dialogue for us to enter the name and address of the new location.
Enter the details as required and save.
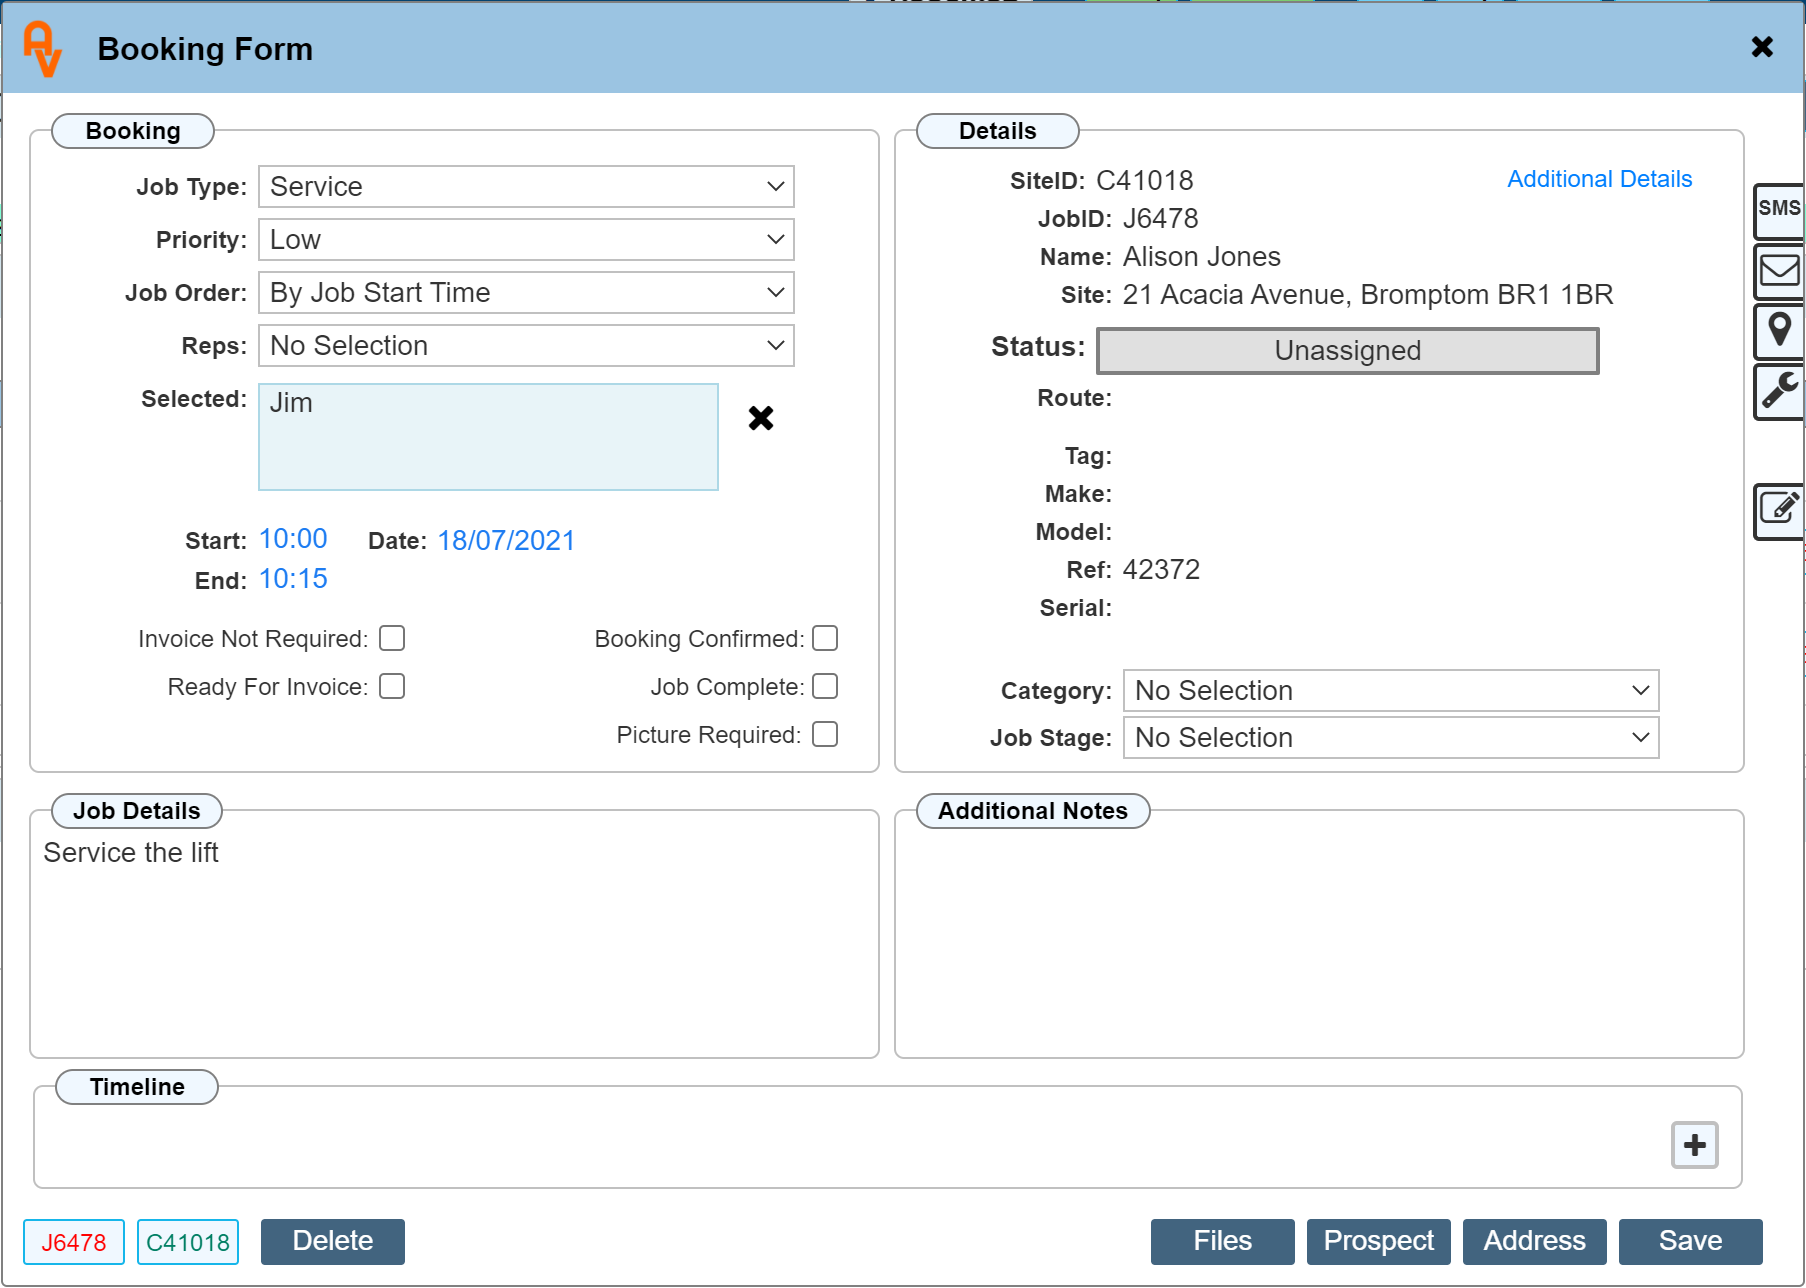
Once the details are saved, the booking dialogue will re-open. The details panel on the right will now indicate the site details.
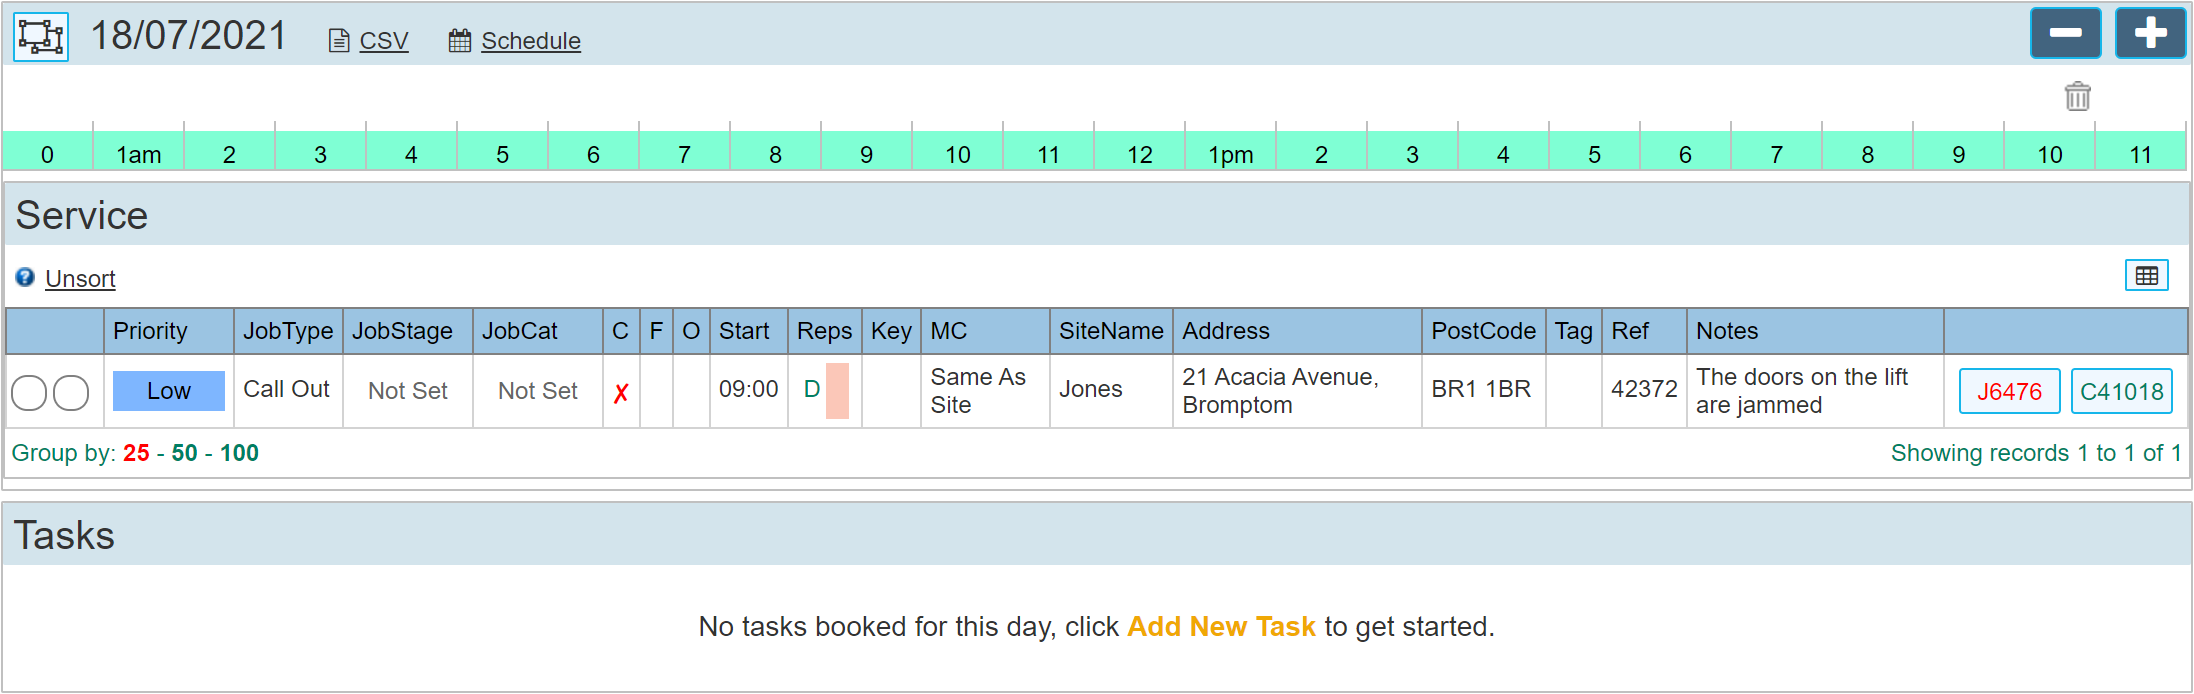
You may now close the booking dialogue to view the Diary. The booking we have just made will be shown.
Because we selected a Rep, the job will also be automatically sent to the reps Workforce Manager Mobile App, there are no other requirements in order to send jobs to the App. We will cover this a little further into the guide.
Link Existing
If our booking is going to be a job for an Existing Site, I.E. one we have previously created as we have done above, we may link the new booking directly to that instead of creating a new site.
It is important to note: Once a site location has been created, it is important to link all subsequent visits to the existing site rather than create new sites each time. This would just create duplicates. Once a site has been created, the details are stored within the system for all future use.
Adding our Second Job Booking
Click the 'Book a New Visit' button shown in the LH menu to open a new booking form and enter the detail for a new job booking.
For this booking we are going to click 'Link Existing' where a new search dialogue will open.
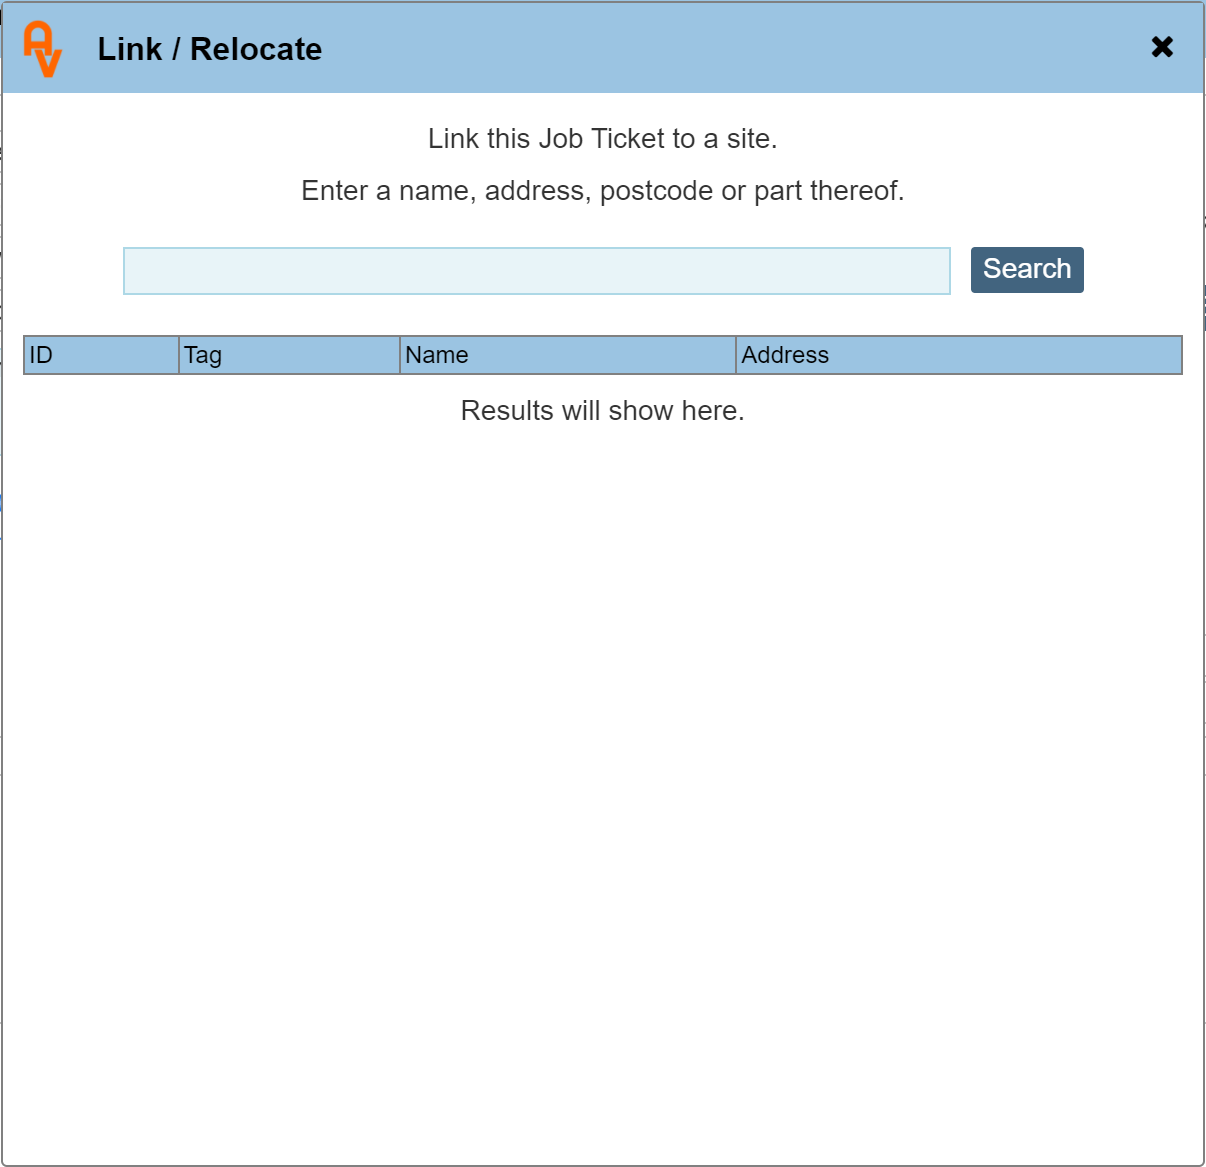
In the search dialogue we will enter 'Alison Jones' this is the name of the site we created earlier in the guide.
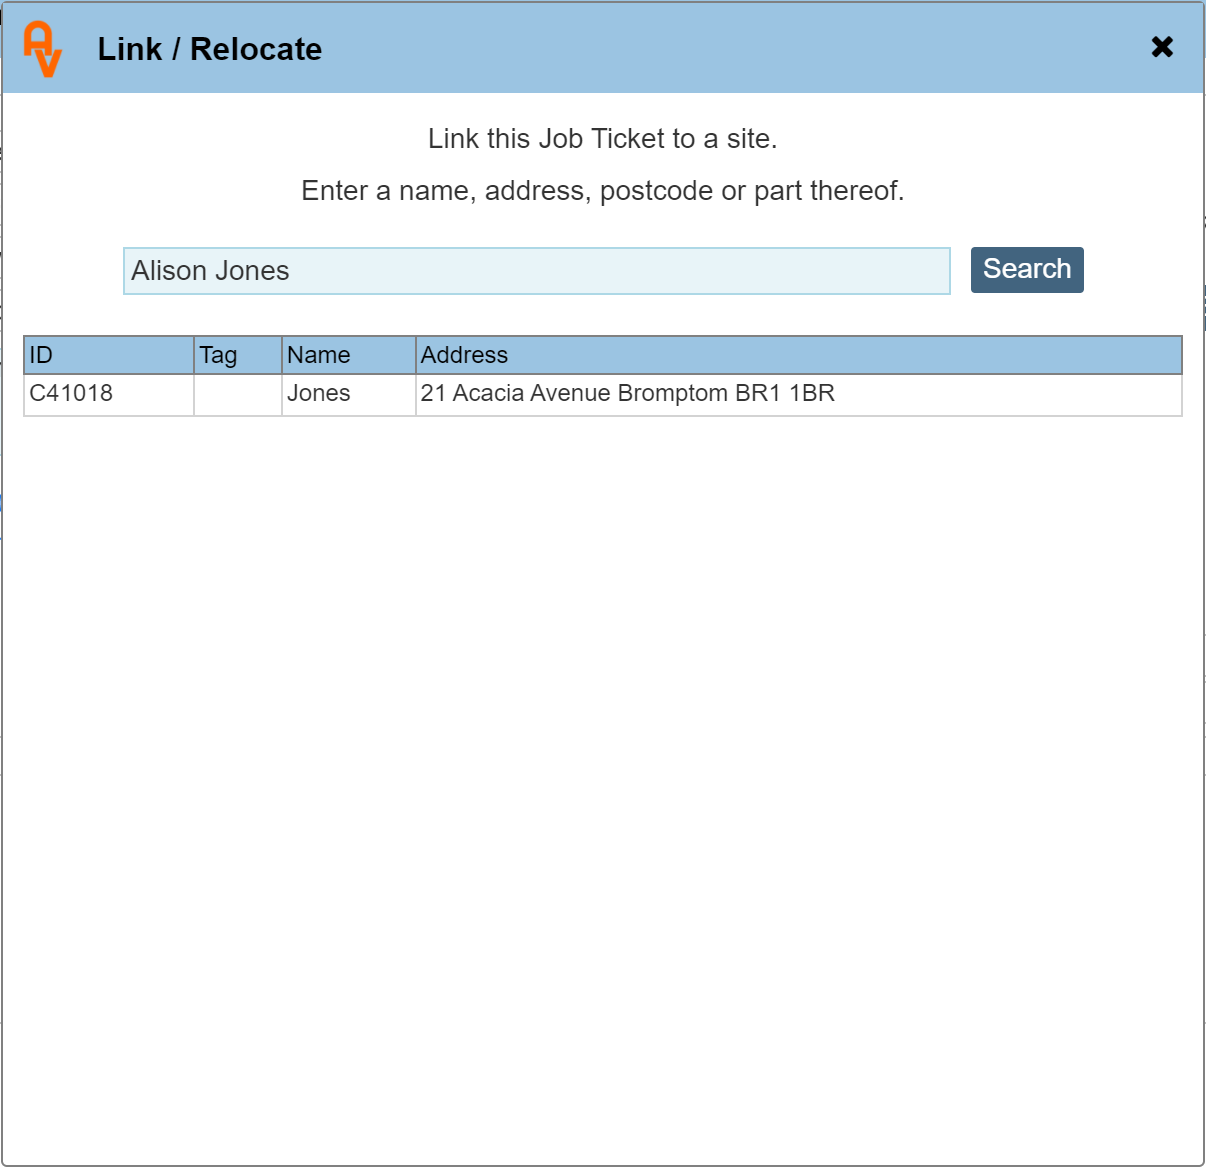
When we click on the 'Search' button, any matches within the system will appear. Our site is shown, we will click on it to link the booking. The Booking dialogue will re-open showing the linked site details.
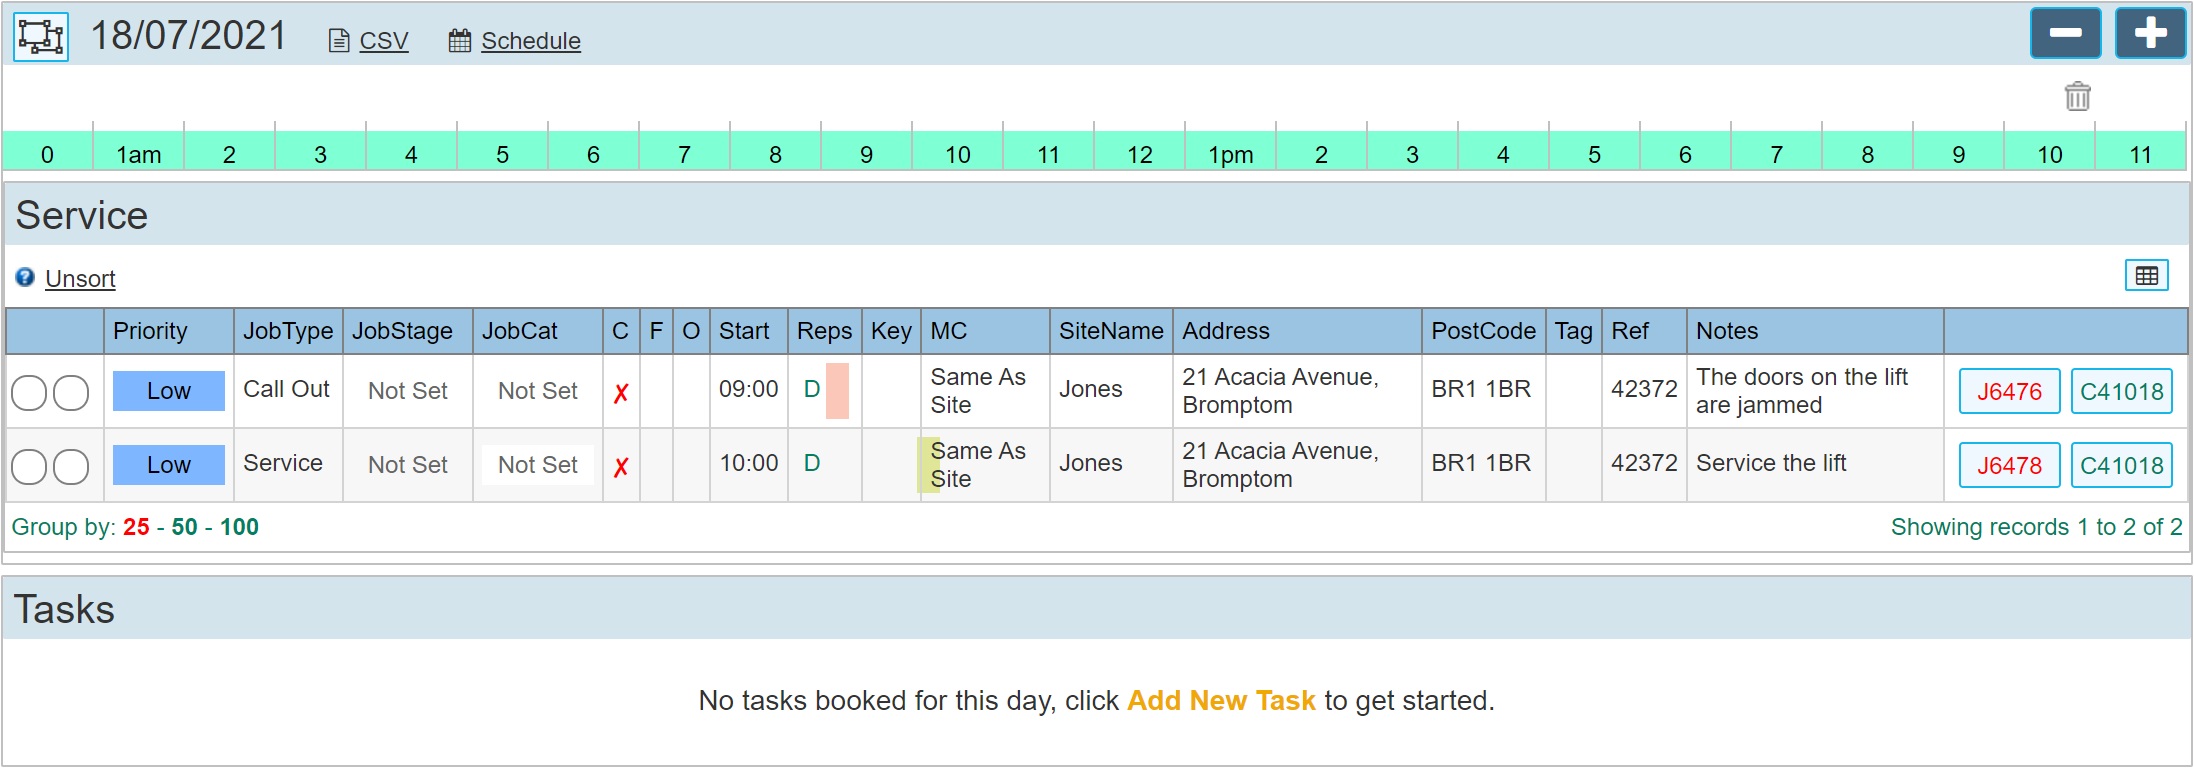
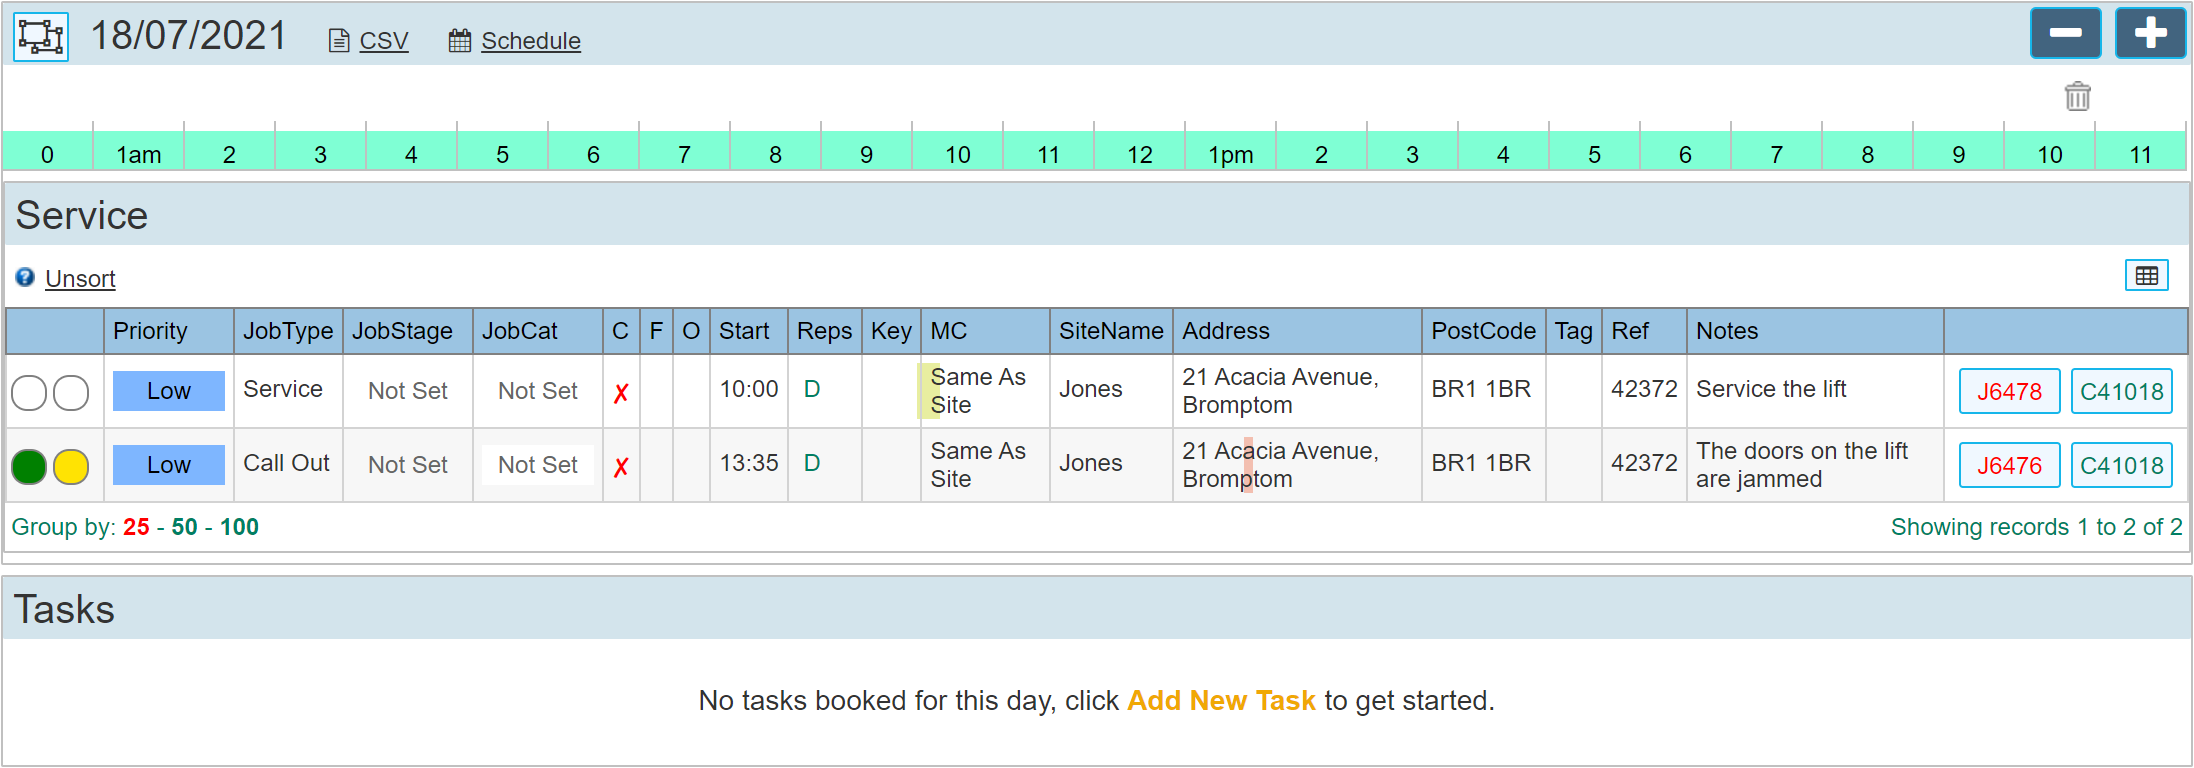
Close the booking dialogue to show the diary. This now shows 2 jobs, both booked for the same site. You may of course add in as many bookings as you wish, each with its own site details.
Next we will detail how the site rep may respond to the bookings we have made using the Workforce Manager Mobile App.
View Jobs on the App
If we now open the Workforce Manager Mobile App and log in as the engineer we selected within the Job Tickets created above, we will see the 2 jobs that have been booked.
.jpg)
We will click on the first job to open the details
.jpg)
We will accept this job, should the reject button be pressed, the rep will be required to enter details why the job was rejected. Clicking the 'Map' button at any time will show directions from the current location of the phone directly to the site location using either 'Google Maps' on an Android or 'Maps' on an iOS Apple device.
.jpg)
The job has been accepted and we have scrolled down the page to view the job details. Before we can enter any details, we must indicate that we are now enroute to the job and subsequently have arrived on site.
On the web diary, each of these stages are shown to the LH side on the grid. Refresh the screen, you will now notice that the 2 small circles that initially show as white have now changed colour.
When the job is first accepted, the LH circle changes to Green (Red if the job was rejected)
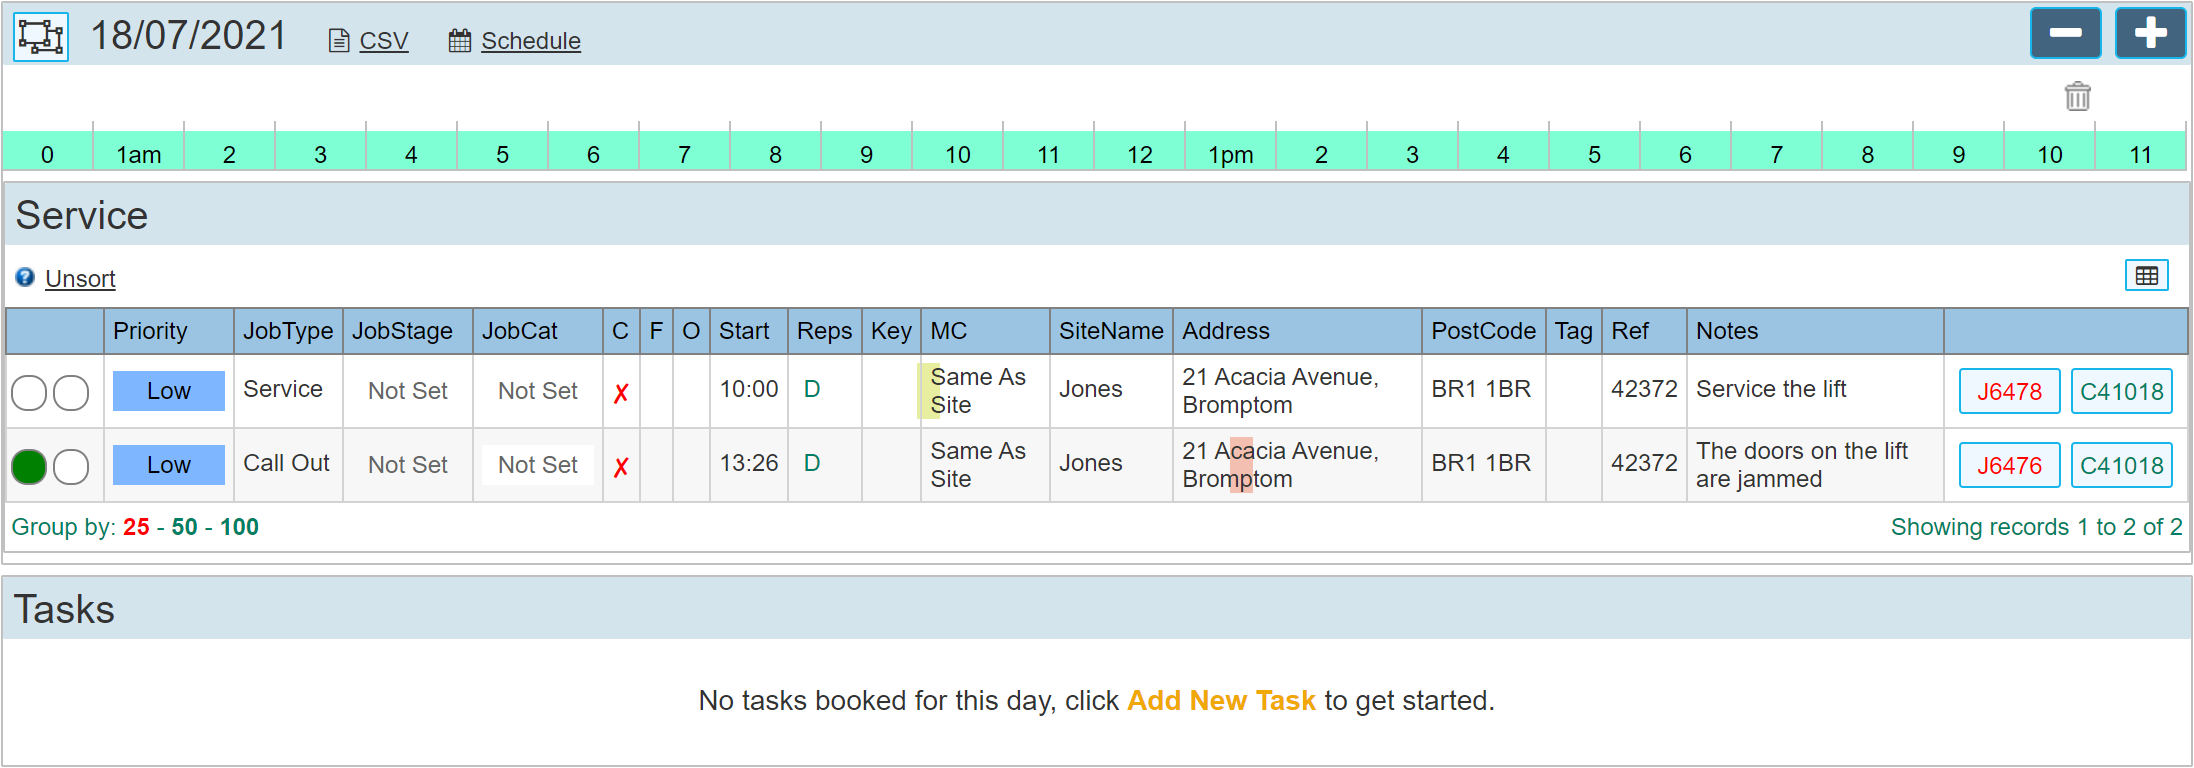
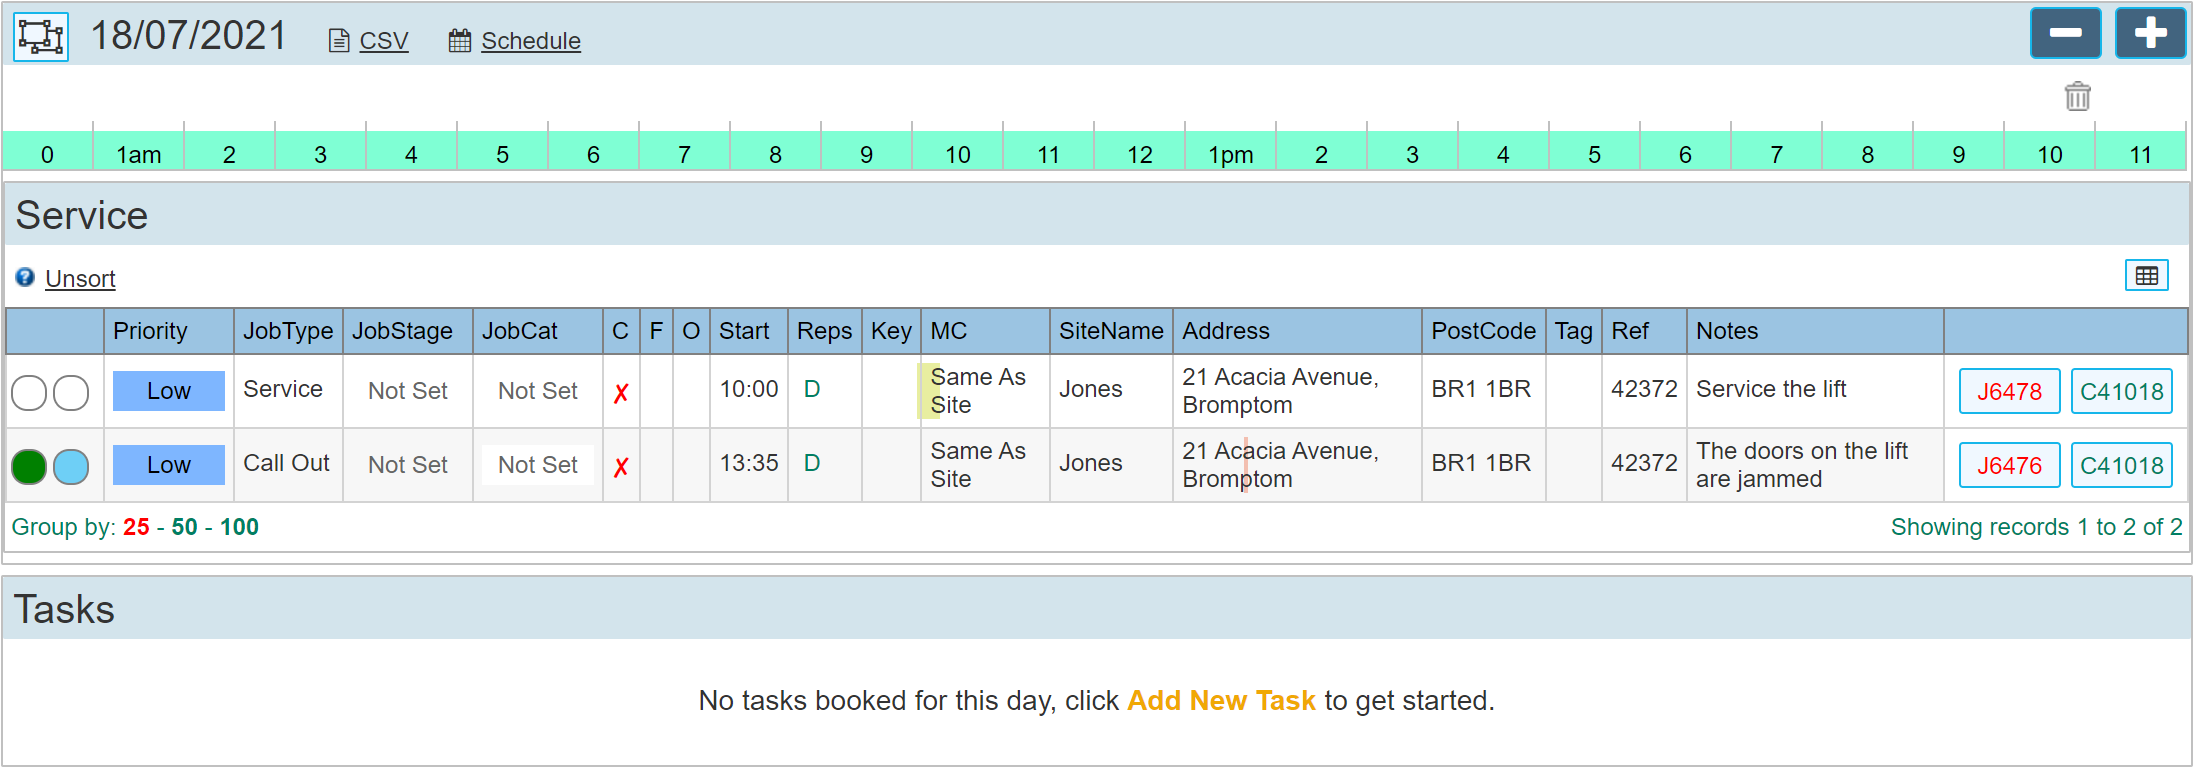
Once the rep using the app indicates that they have arrived On-Site the RH circle changes to 'Yellow'
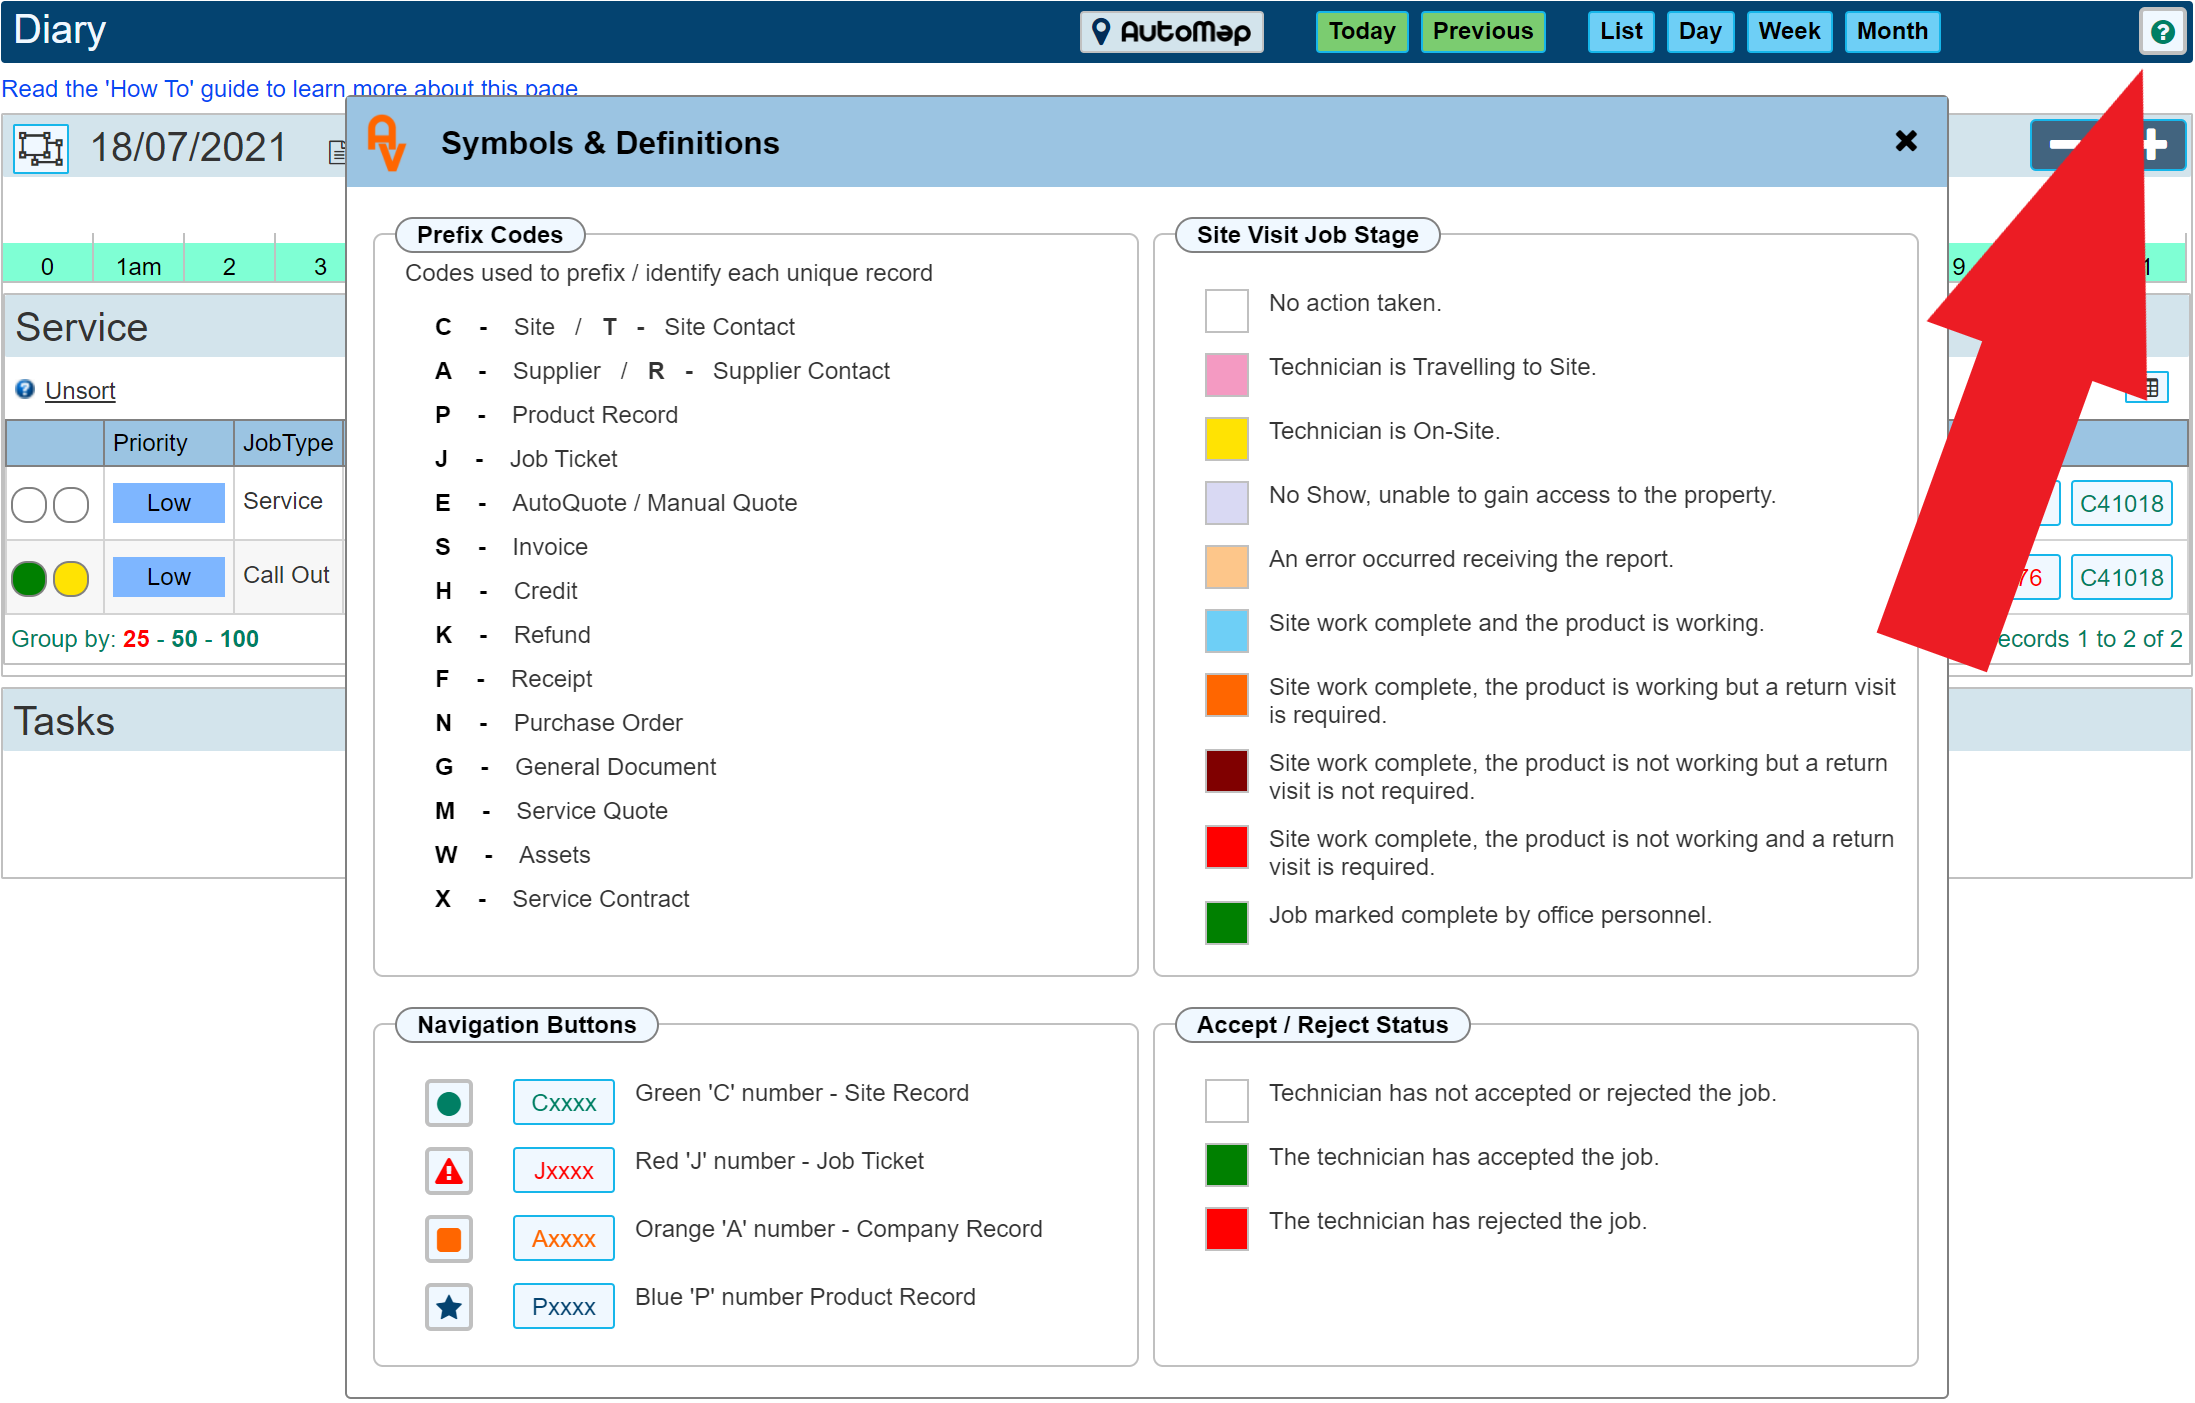
These indicators are very useful in allowing us to know at what stage the engineer has reached. There is a Symbols & Definitions KEY showing what all of these symbols mean.
Finishing the Job On Site
Once the Rep has completed the work On-Site, pictures can be taken and a rep report completed.
1.jpg)
Save the report by clicking the 'Disk' icon at the top right of the screen. This will invoke a series of questions about the job.
- Is the product serviceable. I.E. is it still working.
- Will a return visit be required.
- Was the job done Outside of normal working hours.
Once these questions have been answered, the details are then automatically sent back to the server for viewing on your diary.
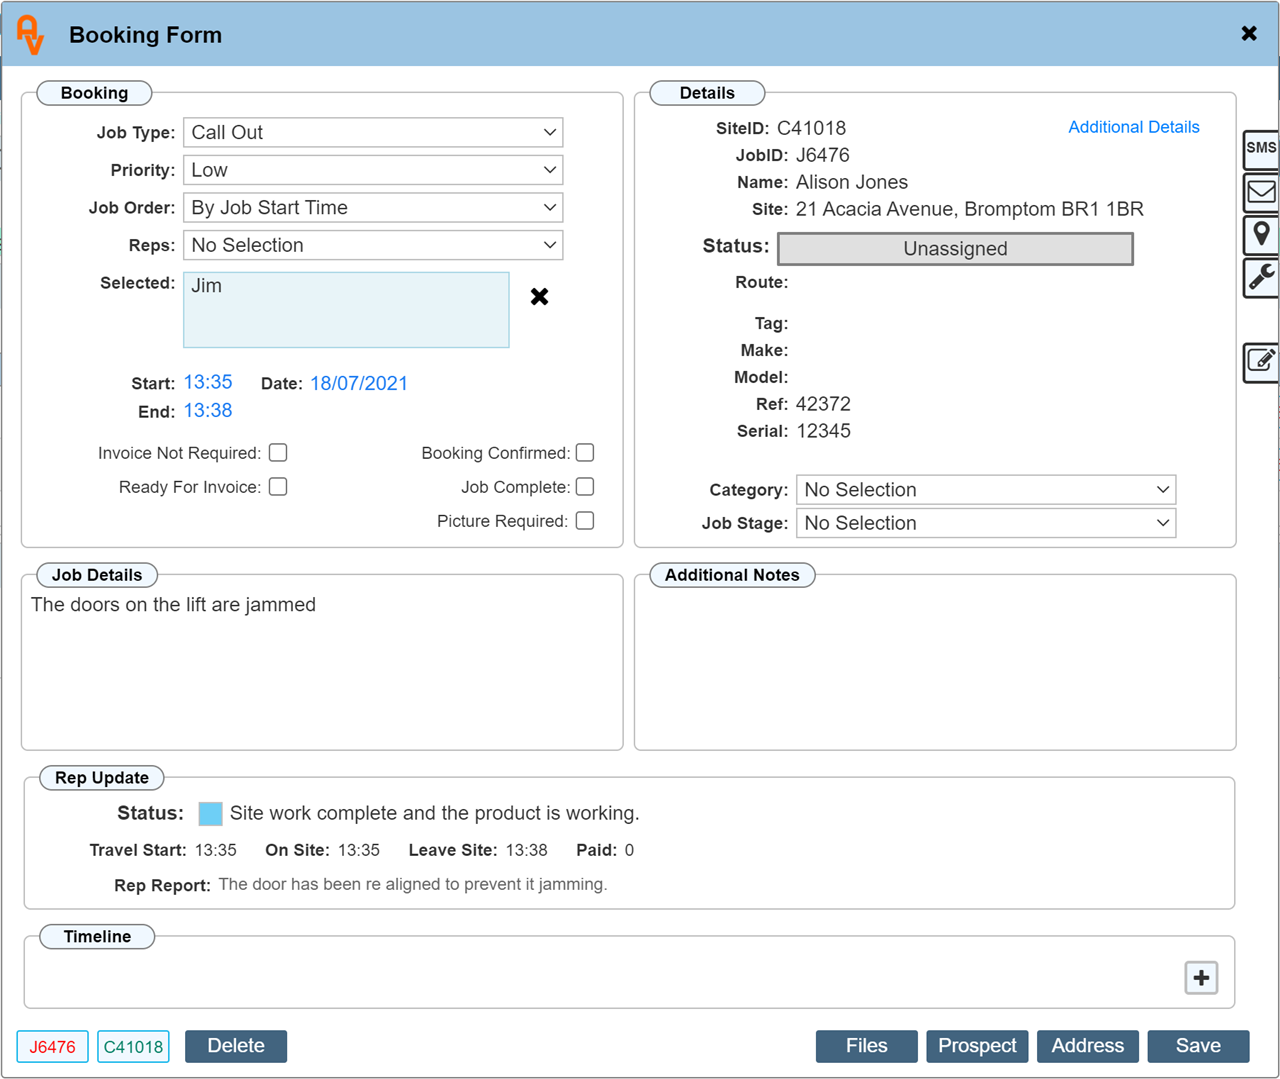
If we click within the grid for our completed job to open the booking dialogue we will see the details of the completed job.
There are many other features and settings you could choose from during the process of booking a visit, but in its simplest form, the method's as shown above detail just how simple it can be to get your jobs booked onto the system and actioned within the Mobile App.
A few questions you may have in mind
Managing Agents
If your business type does work on behalf of another company, these can be linked to each site as required. We call these 'Managing Agents'
E.G. A Local Authority may be responsible for lots of tenants within their borough. Setting the Managing Agent to the Local Authority for each of these sites allows you to group together all sites related to that Local Authority.
Service Check Lists
If equipment is installed or serviced, and a series of checks or questions need answering before the job is signed off, these can be set up and sent to the App for each product type you install or service.
PDF Job Tickets
When the work is complete, all the details gathered about the job can be formatted onto a regular PDF Job Ticket to your own design including your Company Logo and address details.
Furthermore, if you do work on behalf of other companies, you may even create Job Ticket designs specifically for them with their Company Logo and address details showing.
View the Site and Job Tickets
While this beginners guide concentrates on creating Sites and Job Tickets without even leaving the Diary Page, it is possible to view the Site record or Job Ticket page directly. In the diary examples above, you will see 2 buttons to the right of each booking. Click the Red button to view the Job Ticket Page and the Green button to view the Site Record Page that contains all of the Job Tickets created for that Site.
Browse through the various 'How To' guides to find out more about the features within Workforce Manager. Contact us through the Support panel if you require additional help or clarification on any of our guides.